Monday, October 11, 2021

Stories and Babies

I recently went through a training at work called "Building Success in You." It is designed to ingrain in us our company's leadership behaviors, so that we can champion them and push them out to our teams. As part of our closing "homework," we were told to develop a couple personal stories that we could tell that inspire our teams to follow our leadership, and that could be shared to encourage and uplift our peers. 

As a result, I have been poring through some of my old blogs, because I used to write a lot about what was going on with me and in my life. I used to "tell personal stories" all the time. Since getting married and especially since having kids, I have moved away from that. When I post nowadays, it's mostly home improvement / DIY projects. In fact, other than one post, since 2016 I've posted nothing BUT home improvement / DIY projects.

And I've realized something reading those posts from mid-20s Adam. He was going through some relationship stuff when he wrote a lot of those blogs. :) I mean, I knew that, but sorry for anyone who endured Debbie Downer Adam in 2007-08 and was like, geez man. Suck it up. Move on.

My world

Anyway, at this point in my life I am at the tail end of my 30s. I have been married for 12 years, and I have four beautiful children. Four beautiful, exasperating, fun, crazy, sweet, occasionally obnoxious, smart, and great children. Our youngest turned two in June, and we both decided that was it for us. Four is a good number - everyone has a buddy, no one has to sit in the middle seat in the back of the van, we fit around the dinner table just fine. 

We started selling or giving away all of our baby stuff. We saved some sentimental things, but mostly started getting rid of it all. Bassinet, baby swings, toys, baby carriers, clothes, etc. Three of our kids are now in school during the day, so Kristen was excited to get to spend time with just our baby boy this year, and plan for what she would do once he's in school too (she would maybe like to open a bakery at some point in the future). 

Then in September, I went to see my parents and help my dad out with his deck. While there, Kristen called me on Duo unexpectedly, and held up a pregnancy test.

"Are you serious?" I asked.

"Yep."

This was not what we planned.

I worry about talking about that fact. I worry that this child could grow up thinking that because they were not planned, that they are unwanted. That because we had different plans for our future, that they somehow messed up those plans. And I would say absolutely nothing about it, except for the fact that we told so many friends and family that we were done having kids, that there was no way we could play this off as intentional. 

This has been a trial for us. For Kristen especially, who has experienced worse "morning" (aka "all-day") sickness with this one than any of the others, and an inability to take any good medication for her still frequent headaches. For me, that means doing the majority of all household chores (cooking, cleaning, laundry, taking care of the kiddos, etc.) - as she is frequently out of commission - while still working full time (luckily from home).

A few years ago in London, I saw the play Waitress. (SPOILERS AHEAD) And while it includes some terrible messaging (i.e. infidelity with no real consequences for the two protagonists), it also has some great music and some wonderful messages of love, acceptance, overcoming abusive relationships, and...pregnancy! Specifically, the main storyline revolves around Jenna, a woman who has an unplanned pregnancy (with her abusive spouse).

Even if you know nothing about the musical, you may have heard a version of the song "She Used to Be Mine" from it. Here is the radio version by Sara Bareilles (who wrote the music for the play). In it, Jenna laments the hard circumstances in which she has found herself, and sings in part to her unborn child. 

And you're not what I asked for
If I'm honest I know I would give it all back
For a chance to start over
And rewrite an ending or two
For the girl that I knew
...
And then she'll get stuck and be scared
Of the life that's inside her
Growing stronger each day
'Til it finally reminds her
To fight just a little 

But then the baby comes. The penultimate song of the musical is called "Everything Changes" (I've linked it below), and I think that as parents, this is what we feel when we meet our little ones, regardless of our original plans:

Today's a day like any other
But I'm changed, I am a mother, oh, in an instant
And who I was has disappeared
It doesn't matter, now you're here
So innocent
I was lost for you to find
And now I'm yours and you are mine
...
I didn't know, but now I see
Sometimes what is, is meant to be
You saved me
So little one, when you someday find and read this post, I hope you know that you are wanted, you are loved, and that we can't imagine our lives without you. You came into our lives in an unexpected way, but the one thing that is consistent in life is that it is often unexpected and unpredictable. And just like heartbroken 25-year-old me could not see how I could ever find someone to love, 39-year-old me didn't see what my life was missing without you in it.

Monday, July 13, 2020

New (to me) Table Saw

I finally bought a table saw. I know, you probably assumed I already had one by all the amazing projects I've been able to do. What? You didn't? Well, you were right then, I guess. Congratulations.

I've been planning to get a table saw for a long time - I really need one to make more accurate cuts, as well as to make rip cuts (rips cuts = along the grain of the wood; cross cuts = across the grain of the wood), and also to make dados and rabbets (grooves in the middle or edge of a piece of wood). It would have helped with a number of my projects: this one, this one, this one, even this one (the paintbrush organizer had a couple weird angles).

Anytime I had to flip a board over to cut longer than my miter saw would cut, or when I had to use my circular saw to rip a board down, I could have used a table saw. Well, now I have one!

This thing is older than me, folks. It's a 1979 model, and when I got it, it was a rust bucket. The handle to raise and lower the saw was broken because the bolt that lifted it was frozen, and someone turned the handle too hard. Here is a list of all the things wrong with it:
  • Broken handwheel
  • Broke second handwheel when tried to use it (I epoxied that one back together)
  • Broken wheel (to wheel around the saw)
  • Missing blade guard and splitter 
  • Missing arbor wrenches
  • Rust EVERYWHERE - the extension tables, the legs, the clamp for the splitter, the saw blade, the arbor nuts holding the blade on, the bolt that raised/lowered the saw and tilted the saw, etc. etc.
  • Due to its age, virtually no replacement parts available
Here are a few "before" pictures.


I started out trying a method I saw on YouTube for removing rust - putting a Scotchbrite pad on a 1/4 sheet sander and using WD-40 to sand it out. 


That works if you have some surface rust, but not the kind of rust I was talking about.So I switched to a grinder with flap discs, then to sandpaper, then Loctite Naval Jelly (if you need to remove rust from something you can't submerge, I highly recommend that stuff). There was even an adventure trying to use a sand blaster / make a sand blaster in there, but we won't go into that (it technically worked, but was a huge mess and I moved on to using the chemical rust remover instead).


After I got the majority of the rust out and was mostly down to bare metal, I painted all the formerly rusty surfaces with POR 15. It's made for cars, and is fairly expensive ($30 for a pint). But it works great (stops rust without going all the way to bare metal), and I already had it on hand, so I covered all those surfaces with it.


After I did that, I bought some enamel spray paint and painted the extension tables, the saw inset plate, the miter gauge, and the rip fence.


Next I was able to completely clean out the inside, and get all the rust off that bolt to allow the blade to move up and down smoothly. Once all that was clean, I lubed it up to make sure it wouldn't freeze up again, and reattached the fixed handwheel.

I also had to buy/make a few other parts (some of which I'm still waiting on). I ripped off the ruler when I was getting rid of rust, so needed a new one of those. Also needed a handwheel to replace the busted one, a new set of wheels, some arbor wrenches (to remove and install the saw blades), and a splitter (which helps prevent kickback, which is when the cut wood comes back together after getting cut and binds up the blade, forcing the spinning blade to shoot the piece of wood back towards the operator). I actually ended up making a couple of those splitters out of some 16 GA sheet metal and an angle grinder. Since it doesn't raise and lower with the table saw, I wanted one that will work for the majority of my cuts (lower blade, around 3/4-1" high), and then one for when the blade is raised to its max height.


I'm pretty happy with how it's all turned out. This is a SOLID table saw - if it wasn't, I wouldn't have bought it. But it runs well, and now that I've fixed it up and fine-tuned it, I just need to start doing some projects on it!


Monday, June 22, 2020

Art Table & Paint Organization

What are you doing in quarantine? Well, with reduced work hours I have had some additional time to work on house projects. Here are a couple I knocked out in less than a day each.

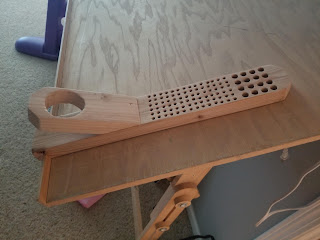
My wife is an artist. Which means she has a whole lot of art supplies, especially paint brushes and paints. Drawing from her Pinterest boards for ideas, I decided to make her a caddy to easily hold her paint brushes when she is painting on her art table (which my dad made when we first got married from plans I found). It usually sits at an angle, so I built it to work with that in mind (slot at the bottom to fit snugly over the lip of the table, water jar set perpendicular to the ground when her table is at her preferred angle).


The other art organization project I did was to help Kristen organize her paints. She has a ton of bottles of acrylic paint, and was storing them in bags on our wire shelves. Again receiving some inspiration via Pinterest, I created a couple simple shelves in an afternoon.

I took some of those craft boards I used for my drawer divider project, and glued and tacked them into place with some 1-inch nails, then filled the holes, lightly sanded, and spray painted them. Then I screwed them into some studs, and voila! Paint storage. She's very pleased by all this. :)


Tuesday, June 9, 2020

Bathroom Mirrors and Moving the Lights

What do you do when you (almost) never leave your house? You improve upon that house! At least, that's what I've been trying to do lately to stay busy and not go crazy. For a while now, I've thought it would be nice to frame our bathroom mirrors, which are just those standard construction bathroom mirrors with clips holding them up. After researching it, it was a very simple project. But of course, I like to complicate things.

As I was putting up the first frame, I realized that what only sort of bothered me before really bothered me now: the lights. If you read my previous lighting posts, you'll know that when I replaced the lighting fixtures in the master bathroom, I had an issue with them being too close to the side walls and ended up having to move them. Well, they were also a little too low. The new orientation of the lights (sconces hanging down), in combination with the frame, made it more apparent that they were too close to the mirror. This was amplified in the upstairs bathroom, where I couldn't even get the frame in place with the light fixture as low as it was.

So I decided to move all the lights up higher. It was a great decision, because it looks so much better. I cut new holes, reinstalled the boxes, drywalled/mudded/sanded/textured/primed and painted, and then put the lights back in. Only thing I would do differently would be to get new boxes (remodel electrical boxes) that go in easier into drywall, without the need for studs/wood to screw into. That would have sped up the process. But once that portion was done, I could finish all the mirrors - and here are the steps to do that:

Step one: Measure the mirrors and buy appropriate amount of MDF trim molding (like what you use for baseboards in your house). I opted for pre-primed trim, so I could just spray paint them with an enamel paint and be good to go.

Step two: Measure and cut pieces with 45-degree miters, then spray paint and let dry (make sure to also paint at least the inside part of the back of the pieces, as the mirror with reflect the inside edge).

Step three: Put the bottom pieces up against the mirror to mark where the clips are, then use a utility knife to notch out spaces for the clips (so the trim piece sits flush on the mirror).

Step four: Use white construction adhesive on the back of the trim, being careful to try and focus on the middle/outer edges, so it won't be visible when it's pressed against the mirror. Then adhere it in place.

Step five: Repeat step four with the two side pieces, making sure to check that the pieces are plumb (i.e. like level, but for vertical pieces).

Step six: Repeat steps three and four for the top piece.

I would also recommend that if you do this, you make the frame a little taller on top, so the top of the frame reaches the top of the mirror clips. When all done, you can caulk along the edges if the frame has an exposed edge.


Where the lights were previously (no frame around the mirror)

Post-frame, but before I raised the lights - you can see how they overlap the mirror frame

After raising up the lights, it looks more open

Back when I originally swapped out the lights in the upstairs bathroom:
see how the light fixture is touching the top of the mirror

Now having installed the frame, with the lights at a better height 

Friday, April 17, 2020

Bathroom Floors

We have lived in our home for about 4 1/2 years now. And we've dealt with some ugly, stained, torn linoleum in both our master bathroom and upstairs bathroom that whole time. With the other updates I've made (cabinets, tiling), it was definitely out of place. The upstairs floor was even pink in some places.


So before the stay-at-home orders for this pandemic, I bought a bunch of vinyl flooring for both bathrooms. It is very thin, clicks together and requires no glue, and can be placed directly over the linoleum (the linoleum acts as an underlayment to protect the floor from the concrete underneath). It's also waterproof, which is perfect for bathrooms.

The process is actually fairly simple. The main thing I think I would do differently is buy knee pads. I bruised my knees pretty good by being on the floor for so long. I also ended up using a lot more tools than I thought I would. The main ones were a hammer (used to tap a sacrificial piece of vinyl into the boards to tighten up the joints after they clicked together), crowbar (pry up baseboards, and move tiles that were along the wall), miter saw, and jigsaw (to cut the pieces to fit). But I also used an oscillating multitool (to cut door trim so flooring would slide under it), a tile contour gauge (to get better fits around objects like toilet flanges and wall protrusions), pencil (to mark lines to cut), and a utility knife (to trim pieces that weren't quite right).

Something I had a hard time figuring out were the gaps. To allow for expansion and contraction, you should leave a 1/4-inch gap around the walls. This is fine when there are baseboards that will go over the top and cover the gaps (or a transition piece to the carpet), but along the tub and shower, or the floor by the mirror, it was trickier. I learned a tip from a YouTuber - only leave 1/8-inch gap on those sides (as long as the opposite side will have a gap), and caulk the 1/8-inch gap with white silicone caulk. Another lesson learned - for those same spots, make sure the tile is in as straight a line as possible, so your caulk line looks great. Mine is less than great.

Anyway, here are some pictures - first the master bathroom:


And the upstairs bathroom - I actually did the toilet area first on this one, which I'm glad I did. Made the rest of the floor easier.


Oh, one more thing on those floor transitions. They use easily bendable plastic anchors, so when you drill your holes, make sure they are the right size and perfectly straight. Then go slowly when attaching the transition piece and make sure the bolts go in straight, or they'll bend, and you'll have to redo the whole thing...like me.

The last step was to touch-up and re-caulk the baseboards - the top with white latex caulk, and the bottom against the floor with white silicone caulk. I made the mistake of using an inflexible caulk along the floors before, and the caulk all cracked in the wintertime and pulled away from the baseboards.


Anyway, hope you enjoy!

Sunday, March 29, 2020

The Family Tree

We used to have a family wall. It had pictures of all the families in Kristen's and my immediate families. Because we've moved several times in our marriage, we were always trying to figure out the best way to arrange the pictures.

After we repainted our walls, we thought it would be cool to put one of those family trees up that we've seen people do. I think often they're big vinyl stickers, but I have an artist in the family, so I said forget that - I'm only paying for a can of paint (but seriously, go check out Kristen's web site: kristenbuchanan.com).

Kristen did the majority of the work - outlining the tree in pencil, and painting most of it (I did inside the trunk and large branches, and cleaned up the pencil after it was all done). And then we put up our family photos. Take a look at the finished product!


Also, here is a GIF of the process of Kristen creating the tree. Enjoy!

Monday, February 24, 2020

Kitchen Table

This is a project I did last summer when I was on paternity leave, and it's one that I'm simultaneously proud of and very disappointed in. I'll tell you why later. First, the build.

We got this table for free from a friend who was moving. It came across the country with us 6 years ago when we moved to Minnesota. It has seen better days. Scratches, dents, food build-up, etc. It also had a very old look and feel to it - the pink tile and yellowing wood does not exactly scream modern.

I didn't take a "pre" shot, but there are plenty of the table -
this one has a tea party going on around it
So I decided to refinish it. I didn't think I would, but I love having tile on a kitchen table - you aren't constantly worried about damaging the wood from a hot dish, and it's easy to clean. So I decided to replace the tile to give it a more modern look (it was also practice for my bathroom project). The backing was a really soft material, which made it hard not to damage, but it came off pretty easily.


I also wanted a different color - anyone who has read my blog knows I like the dark color of General Finishes' Java Gel Stain and Dark Chocolate Milk Paint. It's on my doors and all my cabinets. So that's what I used.


I disassembled and painted the legs and table top separately. After sanding out all the scratches, dents, and the old topcoat, I used my HVLP spray gun and air compressor that I used in my laundry room project. I applied two coats of paint with the sprayer, then went over that with a couple coats of wipe-on polyurethane.


I really like the look of the table - the plan was to also do the chairs, but I got into another project (*cough* bathroom *cough*) and never did. But when it warms up this summer, I'll take those on. Here is a GIF of the new tile going on the table (got it from the ReStore).


After tiling, I taped over the finished wood with painter's tape, then I mixed up the grout and went to town. Grouting went fairly smoothly, and once it was dry / cured, I went over all the grout lines with a grout sealer.


With that, the table was basically done. Reattached the legs and stuck it in the kitchen. But I mentioned some issues earlier, so let's talk about them (and what not to do for anyone doing something similar).

The first issue was the grout I used for the tile. Apparently grout has an expiration date - I didn't know that. But if you've opened the bag, unless you're going to use it relatively soon (as in, less than a year), might as well throw it out. I used the same grout on my kitchen backsplash, and it has held up very well. This time? Not so much. First off, it never seemed to harden - even after a couple coats of grout sealer, it was still powdery. For example, if I rubbed my finger along the grout lines, my finger would come away with white dust on it. In addition, as we have cleaned the grout periodically, it has scraped and chipped away in places, leaving an undesirable appearance. So first lesson: don't use old grout.

Some of the grout has chipped out
Second lesson: use more coats of paint and poly. I have four kids, who are hard on my table. In several places, the paint and topcoat have worn away or been scratched away, leaving the light wood peeking through. Part of the issue was only using a couple coats of paint, applied with a sprayer. Spraying means a more even coat, but it also means less paint used. Which is good for saving money and paint, but less good for durability. The wipe-on poly is also a culprit. It means no brush strokes, but it also means that the poly has been thinned, so you need more coats. I later learned that you need about 3x as many coats of wipe-on poly to equal 1 coat of brush-on. Lesson learned - use more coats.

This is in my three-year-old's spot -
no surprise that it's taken the most damage
So this summer, in addition to the chairs, I will be re-grouting and re-painting my table top. But dang it, it will look good. Here's how well it looked when it was first finished (you can see the chairs need to be done too - they don't match AT ALL). So like I said, even though I am a bit disappointed, I'm still pretty proud too.