Showing posts with label Cabinets. Show all posts

Saturday, January 7, 2017

Kitchen Cabinets

This is a follow-up to my last post on the bathroom cabinets. Redoing those gave me courage to refinish our kitchen cabinets. We have a big kitchen. I counted our cabinets, and we have 11 drawers and 27 cabinet doors, so this was a big undertaking.


I had some time off of work coming up, so I planned to get it all done during that time. I almost did it, too. If only the sanding had taken less time. I only planned for one day of sanding, but ended up taking three.

The process was essentially the same as the bathroom cabinets. First I took all the doors and drawer faces off, then the hinges and handles (which ended up taking about two hours just for that). This time I left the slides on, though, because the soft close slides take a lot more effort to take off / put on than the ones we have in the bathroom. Then I sanded.

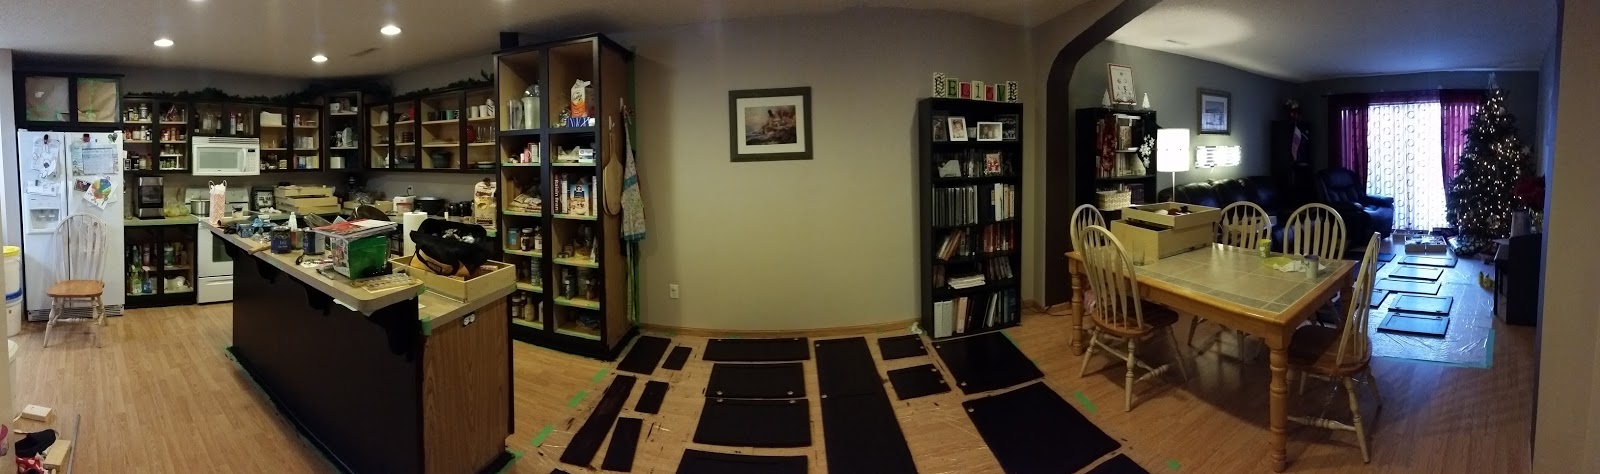
All the doors and drawer faces off and sanded (along the wall)
I bought a quarter sheet sander, and spent three part days (about 4-6 hours each day was all I could take) sanding the cabinet doors and drawer faces, and then the faces of the cabinets themselves. It was quite an undertaking, and I listened to the cast recording of Hamilton about four times. Kristen helped me wipe them down, then I taped down plastic to the dining room and living room floors where the drawers/doors would be.


My original plan was to do two coats the first day - one first thing in the morning, and then one about 8 hours later. However, the first coat ended up taking me about 5 hours, instead of the expected 2-3, so that was out. I did the second coat on day 2 (took about 3.5 hours that time), then took a break on day 3 and did the third coat on day 4 (about 2 hours). I then finished off with the final coat on day 6 (about 2 hours).

After one coat
Four coats, before I painted the sides of the cabinets
I let them dry for five days before applying the two top coats. I decided to apply the finish on one side and let it dry before flipping it over, instead of using the painter's pyramids to do both sides in one pass. That way, there would be no marring of the finish from handling it (though it added some time). I originally wanted to finish the cabinets before Christmas, but that didn't happen. So then I wanted to be done before we left for Portland on the 29th - also didn't happen. But I did get two coats on the front and one coat on the back before we left. After we got back to Minnesota, I did the final coat and reattached everything.

Shiny topcoat v. no topcoat
Now, I also have laminate portions of the cabinets. Instead of real wood, they put up laminate on the some of the sides. For that, I put on two coats of General Finishes Milk Paint (the Dark Chocolate color matches their Java Gel Stain), then added a couple topcoats of the polyurethane gel (even though the paint says it doesn't need a topcoat). And there we have it - refinished kitchen cabinets! Here are a couple angles.


Saturday, December 31, 2016

Bathroom Cabinets

We have a lot of honey-colored oak in our house. And while real wood is nice...I'm not a huge fan of the color. After a lot of research on the internet for changing wood color, I happened upon General Finishes Java Gel Stain. It is a very, very thick, dark gel stain (like a cross between a stain and a paint). If you've ever looked for a way to make oak look like a darker wood, you might have seen it. There are tons of tutorials (this one was the best I found).


I decided that before we changed our entire kitchen, we would try it out on our bathroom first, since it was smaller and less visible to people. This was actually pretty simple to do. The first step was to take off all the doors and drawer faces, and then remove the drawer slides and the hinges so I could get at the wood. I sanded off the shiny top coat first, which ended up being no small task with the grooves on the doors.


After that, I pulled out the stain. It is SUPER thick. I applied it with an old sock (worn on a gloved hand, so no stained fingers for me), and I put FOUR coats on to get it to the color I wanted. You really only need to let it dry about 24 hours between coats, but because I was doing it in the evenings and we had a new baby, sometimes it was longer. Also, because it is winter, I had to let it dry inside. I set up a table in our half bathroom, but it only fit some of the pieces, which means the whole process took me three times as long as I wanted it to.

Comparison: sanded v. one coat of stain 
In process: first coat
Rare action shot: finishing up coat #1
The fourth coat ended up being more of a painting process than the usual wipe on / wipe off of stain. After the fourth coat, I let the pieces dry for 5 days before applying two top coats of a satin polyurethane gel.

No top coat on left | Top coat on right
Then everything was put back together. I think it turned out really well, and determined I would also do the kitchen cabinets, as well as the upstairs bathroom and the banister. I may also end up doing the kitchen table and chairs too. Those are all way down the line in my priority list, though.

Finished product
(planning to paint the trim white)

Tuesday, May 3, 2016

Kitchen Cabinetry


This has been a project that has ended up taking longer than expected. But what else is new? I have a friend from work who is an engineer, and he and his engineering buddies were talking about how they seemed to always be multiplying things by pi (you know, π). Anyway, he found that it always takes him about 3 times as long to do a project as he originally thinks it will take him, which I totally relate to. He calls it the "Pi effect," a term which I will now be using. 

So we love our house, but we don't love a few things about it - hence the projects. One of those things is the golden oak color of the woodwork. And there is a lot of it in the kitchen. Now this post isn't about how we've painted or stained our cabinets (that's yet to come), but we felt we could do something else to help us like our kitchen a little better. Hardware!


We've always wanted soft close cabinets and drawers. They're just so cool. So after a lot of research, I bought some soft close attachments for the cabinet hinges. These were made specially to attach to the type of hinges we already had, so putting them on only took about 15 minutes. Yay!


This is the hardware attachment 
This is how they close now

Then came the part that took forever. Drawer slides. These can be expensive, so after an extensive search, I found them online for about $10 a set (normally around $20 for the 22-inch length we needed). When I got them, I realized I needed a bracket that fit on the back of the cabinet to which I could attach the slides. Ordered those for about $15 (for all of them). When they got here, we realized they were the wrong size and contacted the company. They were very helpful and said they would send the right ones.
 
These are the old slides
On the drawer 
After two weeks, I contacted them again and asked if the correct brackets had gotten shipped (they hadn't, and so they shipped them). So five weeks after originally ordering, I had everything I needed. I took that week to install them (it took me about 20-30 min per drawer to install), and then realized one of the slides was broken. Back online. At this point I'm sure the support person is sick of me. She sends me a new slide, and now I finally have them all done!
The installation process can take a while when you're retrofitting
older cabinets - especially when you're trying to make sure they stay level.
The brackets I needed to attach the slides to the back of the cabinets
Broken slide

The new slides catch really well, which can make it a little difficult to open the drawers - remember what I said about making it look nice? We had planned to add cabinet pulls, so after multiple trips to multiple hardware stores (my life lately) we bought some. Of course, when I go to install them, I drill some holes in a drawer and realize the provided screws are too short. Back to the store, then an hour and a half of installing pulls.

But now they're all done, and they look great!

The drawers (with pulls attached) closing very nicely