Showing posts with label Bathroom. Show all posts

Friday, November 10, 2017

Lighting Final (3 of 3)

With the exception of buying new dome lights and replacing them (which will take about 5 minutes per light), we are done with lighting changes. Finally. First off, if you haven't seen my other lighting posts, check out number 1 and number 2.

In my last post, I posted about the chandelier, as well as painting one of our fans. So first off, I finished the second fan. The first two times I painted light fixtures, I left them up on the ceiling, then just taped off around them. Spray paint fumes aren't fun, though, so after the success of my chandelier wiring (see post 2), I decided to unwire the fixtures and take them outside to spray paint. That went much more smoothly (though a bit difficult getting the fan back up on the ceiling - the wiring part was easy - the actual mounting proved a bit tricky). Here are the before and after of fan #2.


Next, I decided to tackle the bathroom lighting. As I mentioned in post #1, we had that Hollywood lighting in all our bathrooms, and I was looking for something nicer. So I purchased Hampton Bay Andenne light bars, via eBay and Amazon. As with most things you buy from sources like that, there were a few hiccups and a couple trips to Lowe's for additional parts. The half bath and the upstairs bath were both fairly straightforward. Turn off electricity, remove bulbs, pull out bulb holders, pull off face plate, then unscrew mounting plate from junction box, unwire light.

Then do it in reverse. Install mounting plate (though that was actually trickier than expected - I had to get creative with how I connected it - in the end, I bought different mounting plates than were supplied with the lights), wire light to wires in wall (also tricky with one of the lights which, turns out, was missing a wire - dang eBay) - black to black, white to white, ground to ground. Finally, attach light fixture to mounting screws and secure, pop in bulbs, turn power back on, and voila: light!

Half Bath

Girls' Bathroom
I still need to patch and paint, of course (stupid painting). The tricky part was when I decided to do the master bathroom, and replace one big (eight-light) light bar with two three-light fixtures. Because there was only one junction box originally, I had to move it and install another one. Which also meant running wire through the wall. I basically followed all the steps I found in this blogger's post...mostly.

Because you see, when I decided where to put the lights, it just made sense that I would want to put them directly over the sinks, right? Well, I should have double checked that they would FIT right over the sink. Cuz...they didn't. Here's the process:

1. Remove Lights / Cut Giant Hole in Wall and Holes in Studs / Put New Wire in Wall

2. Put Junction Boxes in Place / Pull Wires Through / Start Patching Drywall
3. Finish Putting in Drywall Pieces


4. Tape Drywall Joints

5. Mud Drywall (Not Pictured: Sand a Ton and Get Dust Everywhere

6. Attach wires to light fixtures, turn back on breaker, screw in bulbs, switch on lights, realize left lights aren't working, take everything apart and put back together and then apart again, realize one of the wires was loose, reattach everything again, then sing hallelujah when all the lights come on

7. (Not Pictured) Cry when you realize you should have held up the light fixtures to the wall before you did all that work, so you would know in advance not to put them too close to the wall, since the window shades won't fit where they are

8. Take everything back apart, cut some more holes, move the lights over a few inches, go through the whole process again, and breathe a sigh of relief that it's all done

Saturday, December 31, 2016

Bathroom Cabinets

We have a lot of honey-colored oak in our house. And while real wood is nice...I'm not a huge fan of the color. After a lot of research on the internet for changing wood color, I happened upon General Finishes Java Gel Stain. It is a very, very thick, dark gel stain (like a cross between a stain and a paint). If you've ever looked for a way to make oak look like a darker wood, you might have seen it. There are tons of tutorials (this one was the best I found).


I decided that before we changed our entire kitchen, we would try it out on our bathroom first, since it was smaller and less visible to people. This was actually pretty simple to do. The first step was to take off all the doors and drawer faces, and then remove the drawer slides and the hinges so I could get at the wood. I sanded off the shiny top coat first, which ended up being no small task with the grooves on the doors.


After that, I pulled out the stain. It is SUPER thick. I applied it with an old sock (worn on a gloved hand, so no stained fingers for me), and I put FOUR coats on to get it to the color I wanted. You really only need to let it dry about 24 hours between coats, but because I was doing it in the evenings and we had a new baby, sometimes it was longer. Also, because it is winter, I had to let it dry inside. I set up a table in our half bathroom, but it only fit some of the pieces, which means the whole process took me three times as long as I wanted it to.

Comparison: sanded v. one coat of stain 
In process: first coat
Rare action shot: finishing up coat #1
The fourth coat ended up being more of a painting process than the usual wipe on / wipe off of stain. After the fourth coat, I let the pieces dry for 5 days before applying two top coats of a satin polyurethane gel.

No top coat on left | Top coat on right
Then everything was put back together. I think it turned out really well, and determined I would also do the kitchen cabinets, as well as the upstairs bathroom and the banister. I may also end up doing the kitchen table and chairs too. Those are all way down the line in my priority list, though.

Finished product
(planning to paint the trim white)

Tuesday, June 14, 2016

The Toilet - A Basic Tutorial

The humble commode. Not the most exciting topic for a blog post, but let me tell you, it wasn't a boring experience taking this thing apart and putting it back together. For those of you who have never had the fun of replacing a wax donut, let me tell you all about it.

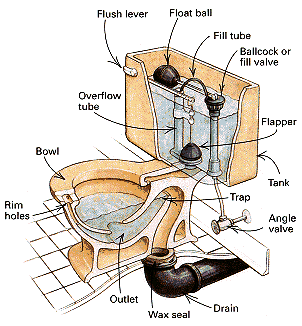
It is sticky... That's about it. Like, really, really sticky. See, in order to trap all those noxious sewer gases out of your bathroom, there is what is called an "s trap" in the toilet, which is basically just a curve in the pipe. There is always water in the trap, which keeps the odor / gases out. Observe:


Toilet removed, wax donut still in place
Wax removed (mostly)
Anyway, when you flush, the water flows from the tank above into the bowl, pushing the water out the trap and down the drain. A wax "donut" is then used to seal the toilet to the pipe below the floor. If the wax seal breaks down, you get leakage, which is gross (see below). To replace it, you first need to scrape off the old wax and get it super clean. Hence...sticky.


Before you can even get it off, you need to shut off the water, then flush to drain the tank. What I should have done at that point was remove the pipe leading to the tank, and catch the remaining water in a cup... You know, instead of trying to scoop it out of the tank and using a ton of paper towels. Lessons learned.

Anyway, once that's done, taking the tank off is simply removing two bolts. Then there's simply no way around it, you have to scoop out the bowl with a cup. Then you remove two more nuts, rock it off the floor bolts, and you're good to go (you may need to cut the caulk along the base, but if you're doing this, it's probably shot, so you won't need to).

After you clean off the old wax, replace it with the new donut you bought, and reattach everything in reverse, and caulk a nice clean line along the base. Easy peasy.


Anyway, that was my Saturday morning adventure a few months ago. Now we have a nice, clean toilet with a working seal. Woo hoo!