Wednesday, June 15, 2016

Desk / Sewing Table

In 2004, when I went back to college after my mission, I needed a desk where I could set my giant desktop computer (no laptop). Being a transient college student, I figured the best idea was a square, folding card table. Years later, after I got married, I bought a corner desk, and that card table ended up being Kristen's sewing table for the new sewing machine I bought her for Christmas.

Unfortunately, because it's a card table, it is not the most study piece of furniture ever constructed. You know...because it's a card table. So when she sews, it has a tendency to shake. What she really wanted was a solid piece of real furniture, especially after I found her a brand-new Singer Serger machine at a garage sale for $100 last month. Shortly after that, in the midst of our crazy garage sale-ing, she found one - a nice, solid, real wood desk. She asked if I could refinish it, and I said sure, not realizing what I was getting into.

This is the desk (and futon bed) before I did anything to it
At this point, by the way, my garage was filling up - I bought a futon bed for Scarlett (that she decided she didn't want, so I just sold it), my motorcycle was in pieces from taking out the carbs to clean, and I was also working on building picture frames for another project. So I wanted to get the desk stripped, stained, and upstairs ASAP. It ended up taking three weeks instead.

I should have consulted my dad first, who long ago refinished our beautiful piano. Instead, I wasted a money and time using a product that did not work very well, and ended up trying to sand a bunch of it off instead, which still didn't work.

First attempt using the first stripper / sanding
Luckily, I told my woes to my dad, who recommended a much better product. I spent the better part of a Saturday painting on the original product, scraping it off, then sanding the wood because it didn't work. With Formby's Furniture Refinisher, I was at it for maybe two hours. Awesome stuff (but use chemical gloves and a respirator, cuz it's POTENT).

Formby's Furniture Refinisher - got that old stain right off

Once the desk was stripped and dry, I put on a natural stain and then a satin polyurethane seal, let it dry, lightly sanded rough spots with steel wool and did some touch up, then took it upstairs. What do you think? I think it turned out all right.


Tuesday, June 14, 2016

The Toilet - A Basic Tutorial

The humble commode. Not the most exciting topic for a blog post, but let me tell you, it wasn't a boring experience taking this thing apart and putting it back together. For those of you who have never had the fun of replacing a wax donut, let me tell you all about it.

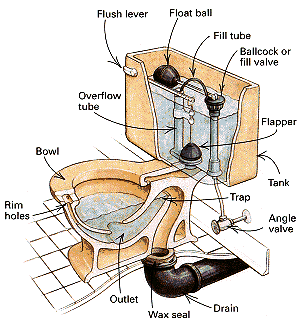
It is sticky... That's about it. Like, really, really sticky. See, in order to trap all those noxious sewer gases out of your bathroom, there is what is called an "s trap" in the toilet, which is basically just a curve in the pipe. There is always water in the trap, which keeps the odor / gases out. Observe:


Toilet removed, wax donut still in place
Wax removed (mostly)
Anyway, when you flush, the water flows from the tank above into the bowl, pushing the water out the trap and down the drain. A wax "donut" is then used to seal the toilet to the pipe below the floor. If the wax seal breaks down, you get leakage, which is gross (see below). To replace it, you first need to scrape off the old wax and get it super clean. Hence...sticky.


Before you can even get it off, you need to shut off the water, then flush to drain the tank. What I should have done at that point was remove the pipe leading to the tank, and catch the remaining water in a cup... You know, instead of trying to scoop it out of the tank and using a ton of paper towels. Lessons learned.

Anyway, once that's done, taking the tank off is simply removing two bolts. Then there's simply no way around it, you have to scoop out the bowl with a cup. Then you remove two more nuts, rock it off the floor bolts, and you're good to go (you may need to cut the caulk along the base, but if you're doing this, it's probably shot, so you won't need to).

After you clean off the old wax, replace it with the new donut you bought, and reattach everything in reverse, and caulk a nice clean line along the base. Easy peasy.


Anyway, that was my Saturday morning adventure a few months ago. Now we have a nice, clean toilet with a working seal. Woo hoo!