Wednesday, June 15, 2016

Desk / Sewing Table

In 2004, when I went back to college after my mission, I needed a desk where I could set my giant desktop computer (no laptop). Being a transient college student, I figured the best idea was a square, folding card table. Years later, after I got married, I bought a corner desk, and that card table ended up being Kristen's sewing table for the new sewing machine I bought her for Christmas.

Unfortunately, because it's a card table, it is not the most study piece of furniture ever constructed. You know...because it's a card table. So when she sews, it has a tendency to shake. What she really wanted was a solid piece of real furniture, especially after I found her a brand-new Singer Serger machine at a garage sale for $100 last month. Shortly after that, in the midst of our crazy garage sale-ing, she found one - a nice, solid, real wood desk. She asked if I could refinish it, and I said sure, not realizing what I was getting into.

This is the desk (and futon bed) before I did anything to it
At this point, by the way, my garage was filling up - I bought a futon bed for Scarlett (that she decided she didn't want, so I just sold it), my motorcycle was in pieces from taking out the carbs to clean, and I was also working on building picture frames for another project. So I wanted to get the desk stripped, stained, and upstairs ASAP. It ended up taking three weeks instead.

I should have consulted my dad first, who long ago refinished our beautiful piano. Instead, I wasted a money and time using a product that did not work very well, and ended up trying to sand a bunch of it off instead, which still didn't work.

First attempt using the first stripper / sanding
Luckily, I told my woes to my dad, who recommended a much better product. I spent the better part of a Saturday painting on the original product, scraping it off, then sanding the wood because it didn't work. With Formby's Furniture Refinisher, I was at it for maybe two hours. Awesome stuff (but use chemical gloves and a respirator, cuz it's POTENT).

Formby's Furniture Refinisher - got that old stain right off

Once the desk was stripped and dry, I put on a natural stain and then a satin polyurethane seal, let it dry, lightly sanded rough spots with steel wool and did some touch up, then took it upstairs. What do you think? I think it turned out all right.


Tuesday, June 14, 2016

The Toilet - A Basic Tutorial

The humble commode. Not the most exciting topic for a blog post, but let me tell you, it wasn't a boring experience taking this thing apart and putting it back together. For those of you who have never had the fun of replacing a wax donut, let me tell you all about it.

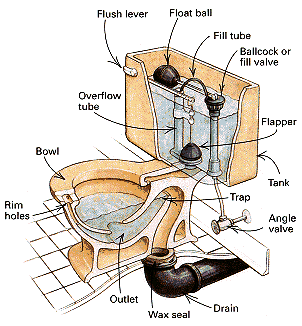
It is sticky... That's about it. Like, really, really sticky. See, in order to trap all those noxious sewer gases out of your bathroom, there is what is called an "s trap" in the toilet, which is basically just a curve in the pipe. There is always water in the trap, which keeps the odor / gases out. Observe:


Toilet removed, wax donut still in place
Wax removed (mostly)
Anyway, when you flush, the water flows from the tank above into the bowl, pushing the water out the trap and down the drain. A wax "donut" is then used to seal the toilet to the pipe below the floor. If the wax seal breaks down, you get leakage, which is gross (see below). To replace it, you first need to scrape off the old wax and get it super clean. Hence...sticky.


Before you can even get it off, you need to shut off the water, then flush to drain the tank. What I should have done at that point was remove the pipe leading to the tank, and catch the remaining water in a cup... You know, instead of trying to scoop it out of the tank and using a ton of paper towels. Lessons learned.

Anyway, once that's done, taking the tank off is simply removing two bolts. Then there's simply no way around it, you have to scoop out the bowl with a cup. Then you remove two more nuts, rock it off the floor bolts, and you're good to go (you may need to cut the caulk along the base, but if you're doing this, it's probably shot, so you won't need to).

After you clean off the old wax, replace it with the new donut you bought, and reattach everything in reverse, and caulk a nice clean line along the base. Easy peasy.


Anyway, that was my Saturday morning adventure a few months ago. Now we have a nice, clean toilet with a working seal. Woo hoo!


Tuesday, May 3, 2016

Kitchen Cabinetry


This has been a project that has ended up taking longer than expected. But what else is new? I have a friend from work who is an engineer, and he and his engineering buddies were talking about how they seemed to always be multiplying things by pi (you know, π). Anyway, he found that it always takes him about 3 times as long to do a project as he originally thinks it will take him, which I totally relate to. He calls it the "Pi effect," a term which I will now be using. 

So we love our house, but we don't love a few things about it - hence the projects. One of those things is the golden oak color of the woodwork. And there is a lot of it in the kitchen. Now this post isn't about how we've painted or stained our cabinets (that's yet to come), but we felt we could do something else to help us like our kitchen a little better. Hardware!


We've always wanted soft close cabinets and drawers. They're just so cool. So after a lot of research, I bought some soft close attachments for the cabinet hinges. These were made specially to attach to the type of hinges we already had, so putting them on only took about 15 minutes. Yay!


This is the hardware attachment 
This is how they close now

Then came the part that took forever. Drawer slides. These can be expensive, so after an extensive search, I found them online for about $10 a set (normally around $20 for the 22-inch length we needed). When I got them, I realized I needed a bracket that fit on the back of the cabinet to which I could attach the slides. Ordered those for about $15 (for all of them). When they got here, we realized they were the wrong size and contacted the company. They were very helpful and said they would send the right ones.
 
These are the old slides
On the drawer 
After two weeks, I contacted them again and asked if the correct brackets had gotten shipped (they hadn't, and so they shipped them). So five weeks after originally ordering, I had everything I needed. I took that week to install them (it took me about 20-30 min per drawer to install), and then realized one of the slides was broken. Back online. At this point I'm sure the support person is sick of me. She sends me a new slide, and now I finally have them all done!
The installation process can take a while when you're retrofitting
older cabinets - especially when you're trying to make sure they stay level.
The brackets I needed to attach the slides to the back of the cabinets
Broken slide

The new slides catch really well, which can make it a little difficult to open the drawers - remember what I said about making it look nice? We had planned to add cabinet pulls, so after multiple trips to multiple hardware stores (my life lately) we bought some. Of course, when I go to install them, I drill some holes in a drawer and realize the provided screws are too short. Back to the store, then an hour and a half of installing pulls.

But now they're all done, and they look great!

The drawers (with pulls attached) closing very nicely

Saturday, February 20, 2016

Kid Book Shelves

It's been a while since I finished and posted a project. It's not for lack of trying. I'm still waiting for some brackets so I can finish my current kitchen project, and have been trying to nail down what I need for some window treatments. But rest assured, those will be on their way (hopefully) soon.

This project was one that Kristen got from Pinterest. Kid book shelves! Now, as you can see, we have some book shelves already. The white one we picked up on the side of the road (marked "free") and the other one we bought for around $25. But if you know my wife, you know she loves books, and that certainly has been passed along to our kids. They have a ton of books, and they don't fit (well) into our current shelving situation.


The solution was to build some shelves into our kid area (which I realized I haven't blogged about yet - I need to get on that). What someone on the internet realized was that house gutters work perfectly for children's books. Earlier this week, we decided to give it a try.

We used one vinyl 10-foot gutter (purchased for $4 from Lowe's), and measured the area. We have a half wall that is six feet long, and our current book area is about three feet wide. I tried the six-foot shelf by itself at first, to see how we liked it.


We decided it worked, so today I went and got the second shelf, and cut it to match the first one. The four-foot pieces worked perfectly on our other wall (since we didn't need to cover the vent on the floor). Here's how it looks. What do you think?

Thursday, January 28, 2016

Toy Room

Scarlett and Felicity have a TON of toys, and we try to keep them corralled as best as we can. We have a room in our house off our upstairs living room that is more like a big closet.


When we moved in it was just an empty room, so I decided to add shelves to help make it more useful. I added two shelves initially, and put up board games and some of the bigger toys up there.

First set of shelves
But Scarlett has a TON of princess dresses, and I thought it would be good to hang those up, to make room for other dress-up items in the dress-up box. I also thought that even with the initial shelves, there wasn't a lot of room to play. So...I added two more shelves along the long wall. We also got an extra stepping stool to make it a little easier for the girls to get stuff on and off the shelves. Here is the final product. This picture makes it seem a bit cluttered, but when toys get put away (on the rare occasion), there is lots of space for playing.

Panoramic Shot with all shelves

Monday, January 25, 2016

New Bed

Kristen and I have slept on a full size bed since we were first married, and it was about time for an upgrade. That's right, we moved up to a king. We found a metal frame and box springs gently used, and bought the mattress online from Tuft & Needle. We found our bedspread and pillows at Bed Bath & Beyond.

This project is similar to the workbench, in that the headboard is made entirely of inexpensive pine. I followed a pattern Kristen found a online, and it turned out pretty good. After I figured out how to use the jig, the most difficult part was probably sanding all the edges, but it worked out fine in the end. I probably didn't spend more than three-four hours cutting, drilling, screwing, and sanding, then two or three hours priming / painting.

Our new bedspread (pre-headboard)
Dry-fit
Sanded down and ready to paint
Close-up of the holes the jig made
Prime coat, ready to paint

Final product attached to the bed

Sunday, January 10, 2016

Workbench - Revisited

I've always wanted a work bench, and I found some plans online for one. Made entirely out of 2x4's and one sheet of plywood - not bad, huh? If you're interested in the plans, you can find them here

The only regret I have making this is that I had not yet purchased my DeWalt drills yet. Those would have made everything go SO much faster / smoother. I also probably wouldn't have broken two drill bits.

Tabletop and bottom shelf, plus the rest of the cut pieces 
Frame assembled
Added the tabletop and bottom shelf plywood pieces
Took me an extra week before I got around to adding the top shelf
Since building the workbench, it's gotten a lot of love. I've also made a couple modifications. Take a look and let me know what you think.

I found some routers at a garage sale, and built a folding router table for one of them.
I have some legs that go underneath the table when it is pulled out.

I looked for a paper towel holder, but couldn't find one I liked for cheap,
so I made this one out of some scrap wood and a dowel I had lying around

Similar to the router above, I bought this bench grinder and needed a place to put it, so I attached this side table with hinges, with some legs for underneath it when in use. Also visible: my swiveling bench vise. Out of the way yet still accessible.