Monday, February 24, 2020

Kitchen Table

This is a project I did last summer when I was on paternity leave, and it's one that I'm simultaneously proud of and very disappointed in. I'll tell you why later. First, the build.

We got this table for free from a friend who was moving. It came across the country with us 6 years ago when we moved to Minnesota. It has seen better days. Scratches, dents, food build-up, etc. It also had a very old look and feel to it - the pink tile and yellowing wood does not exactly scream modern.

I didn't take a "pre" shot, but there are plenty of the table -
this one has a tea party going on around it
So I decided to refinish it. I didn't think I would, but I love having tile on a kitchen table - you aren't constantly worried about damaging the wood from a hot dish, and it's easy to clean. So I decided to replace the tile to give it a more modern look (it was also practice for my bathroom project). The backing was a really soft material, which made it hard not to damage, but it came off pretty easily.


I also wanted a different color - anyone who has read my blog knows I like the dark color of General Finishes' Java Gel Stain and Dark Chocolate Milk Paint. It's on my doors and all my cabinets. So that's what I used.


I disassembled and painted the legs and table top separately. After sanding out all the scratches, dents, and the old topcoat, I used my HVLP spray gun and air compressor that I used in my laundry room project. I applied two coats of paint with the sprayer, then went over that with a couple coats of wipe-on polyurethane.


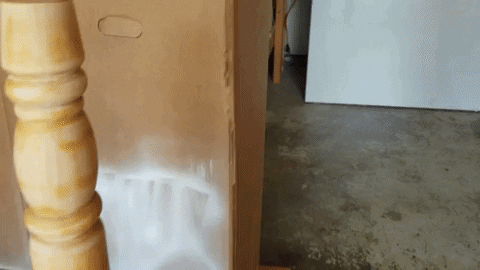
I really like the look of the table - the plan was to also do the chairs, but I got into another project (*cough* bathroom *cough*) and never did. But when it warms up this summer, I'll take those on. Here is a GIF of the new tile going on the table (got it from the ReStore).


After tiling, I taped over the finished wood with painter's tape, then I mixed up the grout and went to town. Grouting went fairly smoothly, and once it was dry / cured, I went over all the grout lines with a grout sealer.


With that, the table was basically done. Reattached the legs and stuck it in the kitchen. But I mentioned some issues earlier, so let's talk about them (and what not to do for anyone doing something similar).

The first issue was the grout I used for the tile. Apparently grout has an expiration date - I didn't know that. But if you've opened the bag, unless you're going to use it relatively soon (as in, less than a year), might as well throw it out. I used the same grout on my kitchen backsplash, and it has held up very well. This time? Not so much. First off, it never seemed to harden - even after a couple coats of grout sealer, it was still powdery. For example, if I rubbed my finger along the grout lines, my finger would come away with white dust on it. In addition, as we have cleaned the grout periodically, it has scraped and chipped away in places, leaving an undesirable appearance. So first lesson: don't use old grout.

Some of the grout has chipped out
Second lesson: use more coats of paint and poly. I have four kids, who are hard on my table. In several places, the paint and topcoat have worn away or been scratched away, leaving the light wood peeking through. Part of the issue was only using a couple coats of paint, applied with a sprayer. Spraying means a more even coat, but it also means less paint used. Which is good for saving money and paint, but less good for durability. The wipe-on poly is also a culprit. It means no brush strokes, but it also means that the poly has been thinned, so you need more coats. I later learned that you need about 3x as many coats of wipe-on poly to equal 1 coat of brush-on. Lesson learned - use more coats.

This is in my three-year-old's spot -
no surprise that it's taken the most damage
So this summer, in addition to the chairs, I will be re-grouting and re-painting my table top. But dang it, it will look good. Here's how well it looked when it was first finished (you can see the chairs need to be done too - they don't match AT ALL). So like I said, even though I am a bit disappointed, I'm still pretty proud too.

Monday, February 17, 2020

Drawer Dividers

This was probably the quickest project I've done that is posted on this site. From start to finish, it took about an hour and a half, but it makes a big difference.

We have a lot of drawers in our kitchen (see my cabinet post). Despite that, we still end up with a free-for-all in several drawers, where utensils are thrown in willy-nilly. Invariably, it leads to a fair amount of, "Hon? Do you know where [X utensil] is?!" So I thought I'd create some organization.

First, I created the layout - I took everything out of the drawer, then added everything back where I wanted it, and used tape to show where I wanted the dividers.


Next, I built the dividers. I used some pine craft board from Lowes. I bought six 3-foot long, 3/8-inch thick, 2 1/2-inch tall boards called "project boards." I took each drawer out to the garage where I was working, and cut each piece to fit as snug as possible in the drawer. I started with pieces that spanned the entire drawer, set them in place, then held pieces up to get the next measurement. The beauty of this project is I hardly used a tape measure at all. 


To hold everything together, I used wood glue and 1-inch finishing nails (shot in with a nail gun). So that everything stayed square, I would make a mark at the top of each board to its joining piece, tack in one nail, then flip it over and use a speed square to make sure everything lined up, mark another line, and use that to keep it in place when I tacked the nail in the other side.


I did three drawers, and they all turned out really well. I also still have two boards leftover, so I can do the silverware drawer next. This was a super easy project, and makes everything look awesome. Here is the process for the drawer that was the main reason for this project, and it's my favorite. Enjoy!