Thursday, January 28, 2016

Toy Room

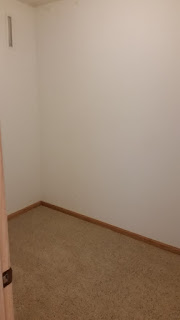
Scarlett and Felicity have a TON of toys, and we try to keep them corralled as best as we can. We have a room in our house off our upstairs living room that is more like a big closet.


When we moved in it was just an empty room, so I decided to add shelves to help make it more useful. I added two shelves initially, and put up board games and some of the bigger toys up there.

First set of shelves
But Scarlett has a TON of princess dresses, and I thought it would be good to hang those up, to make room for other dress-up items in the dress-up box. I also thought that even with the initial shelves, there wasn't a lot of room to play. So...I added two more shelves along the long wall. We also got an extra stepping stool to make it a little easier for the girls to get stuff on and off the shelves. Here is the final product. This picture makes it seem a bit cluttered, but when toys get put away (on the rare occasion), there is lots of space for playing.

Panoramic Shot with all shelves

Monday, January 25, 2016

New Bed

Kristen and I have slept on a full size bed since we were first married, and it was about time for an upgrade. That's right, we moved up to a king. We found a metal frame and box springs gently used, and bought the mattress online from Tuft & Needle. We found our bedspread and pillows at Bed Bath & Beyond.

This project is similar to the workbench, in that the headboard is made entirely of inexpensive pine. I followed a pattern Kristen found a online, and it turned out pretty good. After I figured out how to use the jig, the most difficult part was probably sanding all the edges, but it worked out fine in the end. I probably didn't spend more than three-four hours cutting, drilling, screwing, and sanding, then two or three hours priming / painting.

Our new bedspread (pre-headboard)
Dry-fit
Sanded down and ready to paint
Close-up of the holes the jig made
Prime coat, ready to paint

Final product attached to the bed

Sunday, January 10, 2016

Workbench - Revisited

I've always wanted a work bench, and I found some plans online for one. Made entirely out of 2x4's and one sheet of plywood - not bad, huh? If you're interested in the plans, you can find them here

The only regret I have making this is that I had not yet purchased my DeWalt drills yet. Those would have made everything go SO much faster / smoother. I also probably wouldn't have broken two drill bits.

Tabletop and bottom shelf, plus the rest of the cut pieces 
Frame assembled
Added the tabletop and bottom shelf plywood pieces
Took me an extra week before I got around to adding the top shelf
Since building the workbench, it's gotten a lot of love. I've also made a couple modifications. Take a look and let me know what you think.

I found some routers at a garage sale, and built a folding router table for one of them.
I have some legs that go underneath the table when it is pulled out.

I looked for a paper towel holder, but couldn't find one I liked for cheap,
so I made this one out of some scrap wood and a dowel I had lying around

Similar to the router above, I bought this bench grinder and needed a place to put it, so I attached this side table with hinges, with some legs for underneath it when in use. Also visible: my swiveling bench vise. Out of the way yet still accessible.


Sunday, January 3, 2016

The Garage

When we moved in, the first problem we had to tackle was the garage. Apparently, the people who lived here before us smoked like chimneys...and they did it all in the garage. You can see by the photos how yellow the walls were from the smoke. We used some serious paint, called Killz. It's an oil-based primer made specifically to seal odors, stains, etc. like smoke and mildew. It worked great, but had some serious fumes (hence the masks).


Next order of business was organization. I installed shelves at the front of the garage for moving boxes right above where we keep our garbage cans (our HOA requires us to keep them in the garage). Kristen thinks I'm crazy for keeping those boxes, but moving boxes are expensive! I also added insulated panels to the garage door, to keep the temperature a little more moderate.


I also got some wire shelving units to store boxes along that wall, and hung up the bikes.


I also built a workbench (which will be the subject of another post), and bought a motorcycle dolly. I wanted to be able to fit both cars and the motorcycle in the garage - the dolly allows us to move the motorcycle around easily and fit it where there is room. We also got a laser parking guide that I installed on the ceiling.


There are still some things I want to do with the garage, but I like how it's turned out so far.

Here is a picture of the laser parking guide - it's plugged in near the garage door opener.

House Projects 2016

In August, we bought a house. It's not a brand new house, so of course there are things we want to change about it. We've done a lot so far, but still have a lot we want to do. So for the next year, I'm going to catalog the things that I've done to make our house into a home. Stay posted!