I had 12 weeks of paternity leave when my little boy was born in June. It was amazing to be able to bond with my little one, but I still had extra time to get some projects done. In fact, my last three posts were done when I was on paternity.
This project was not supposed to be a big project - I wasn't planning to take on any "big" projects while on paternity, just projects I could get done in a day or two. But sometimes things get away from you.
I've never really cared for this shower. I don't like the shiny metal of the door, the white tile is boring, and the grout work has been chipping since we moved in. I filled it in with caulk and redid the caulk along the bottom once upon a time, but it didn't take very well (read: got mildewy).
 |
| When we first moved in |
But the plan was just to recaulk, clean out the grout and re-grout it, and take out a couple rows of tile and add an "accent row." But after a couple hours trying to chip out the tile, remove the grout, and remove the silicone caulk, I'd had it. The tile wasn't coming out (it was pulling the cement board behind it out), the grout saw attachment I had was chipping the tile edges, and the silicone was not cooperating.
"Honey, I think I'm just going to rip it all out," I said.
"...Okay."
And thus began my adventure. I took out the shower door and half wall/window, and got to work chipping out tile. As before, it wasn't going well, and I ended up pulling off the cement backer board with the tiles still attached instead.
 |
We had a soap dish and weird towel bar
IN the shower, glued to the tile |
 |
| Half wall with frosted glass window |
 |
| You can see all the mildew on the silicone |
 |
| Just ripped the whole board off the studs |
 |
| I ended up ripping out the drywall above the shower head too |
I went around the whole shower, including that half wall, then made my way to the bath tub side. The tile on that side still looked nice, but I couldn't have two types of tile in the bathroom, so out it went too.
 |
| All the tile ripped out |
Next, I decided that I didn't want a half wall - if I was retiling this thing, I was going to make the shower go all the way to the ceiling. So I framed in a wall (which was pretty cool). I also ripped out the drywall above where the tile had ended, so I could tile all the way up.
 |
| Drywall above ripped out |
We also decided we wanted a shelf of some sort (since we ripped out the weird towel bar we had been setting our shampoo and soap on). So I built a box out of plywood, attached cement board, and screwed it between the studs on the wall (as that's an outside wall, I just compressed the insulation behind the shelf box).
 |
| Framed wall with shelf built in |
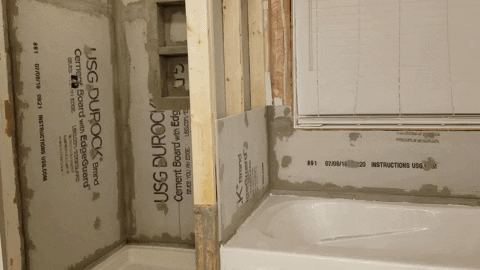
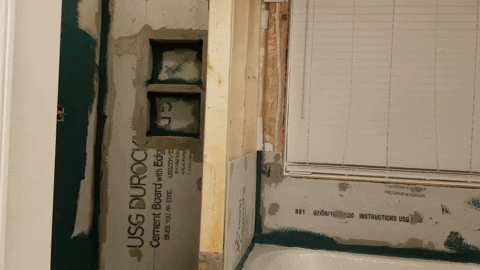
The next step was to put in cement backer board. This wasn't too difficult. It cuts pretty easy with a regular razor blade, though it dulls the blades pretty quickly (I went through a bunch). I think there are better tools for cutting, but it worked for me. For the holes, I first made a template using a cardboard box. Then I traced that onto the cement board, and used a masonry drill bit / a jigsaw with a masonry bit to cut out the holes. Made quick work of everything. But this is where I made my first mistake. I wasn't careful about making sure the cement board lined up perfectly, or checked that the walls were plumb. This was mainly an issue later when tiling.
After the cement board was in, on the joints I added mesh tape made specifically for it (super sticky - if you do this, wear gloves at this point for sure).
 |
You can see I took off the window trim to get the cement board
in place - I also only did cement board partway up the new wall.
For the rest, I later added in drywall. |
 |
| Here is the shower with joints taped |
Here is where I made my second mistake. When I took the trim off the window, I didn't mark on the wall where the tile should stop. This is going to be a problem later on.
But moving on. I watched so many tutorials on YouTube about how to make sure my shower was waterproof, and didn't leak into the wall, that I probably went a little overboard. But better safe than sorry, I say.
I first took some mortar I would be using for the tile, and mortared over all the joints. This is my third mistake, in conjunction with my first - I wasn't very careful about how I smoothed out / leveled the walls. I just assumed it wouldn't be a problem when I went to set my tile that the walls weren't perfectly smooth. While it's not a huge issue, it does make for a more difficult tiling experience.
One last thing for this post, and then I'll get to tiling in the next one: waterproofing. I went with a roll-on waterproof membrane made by Mapei called
Aquadefense. It worked fantastic and was very easy to work with. It is super thick, but rolls on like paint. I bought a cheap, disposable paint tray/brush/roller, and used it the same way I would paint.
 |
| Waterproofing Action Shot #1 |
 |
| Waterproofing Action Shot #2 |
 |
| Completed waterproofing |
 |
| Shot of the waterproofing in the shower |
 |
| Drywall added above the waterproofed area |
There you have it! Technically, I could have showered at that point, as everything is waterproof. But of course, I had to do more. I'll talk about that in the next post.


No comments:
Post a Comment